192.168.1.250
The Netgear WiFi extender is one of the networking devices that you can easily conenct with any router. But if you want to make the extender setup complete or manage its settings, then you must use the IP address 192.168.1.250. This will take you to the mywifiext interface window.
More information will be given below about the IP address like how to access it, settings to manage, issues and solutions.
192.168.1.250- Netgear Admin Panel
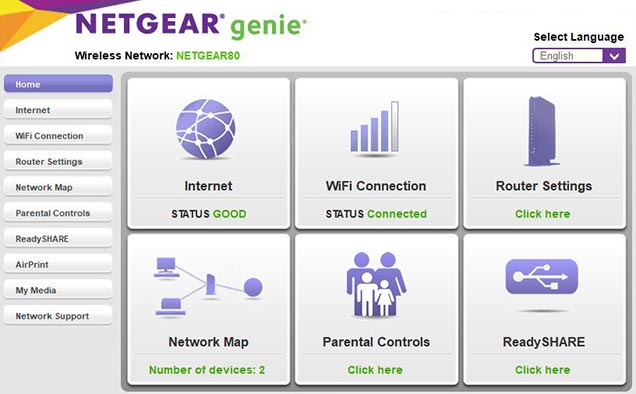
Mostly, this mentioned IP address used to the get to the Netgear extender Genie interface, where a user can manage the device settings. Have a look how to do it in your computer:
Start with connecting the computer to the extender network that is netgear_ext or you can do it with the Ethernet cable.
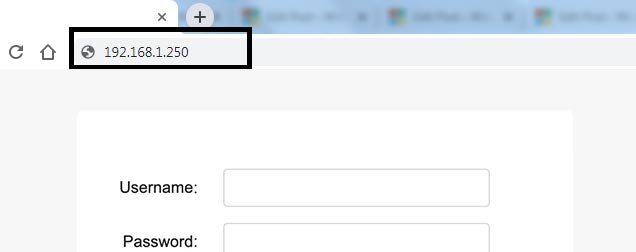
- Now, open an updated web browser on your computer and type in the IP address.
- you will get to the Netgear Genie interface window where you must enter the admin credentials to access.
- Majorly, the username and password are given on the label of the extender or in the user manual.
- Just enter the details and Login to the device interface, here you can manage all the settings of the extender.
The Genie wizard can be accessed through the URL mywifiext.net and setup your device. There are several settings that you can adjust from the 192.168.1.250 IP, have a close look;
192.168.1.250 Settings
How to update WiFi Extender?
- Access the Netgear extender Genie wizard in your computer through the IP address.
- Go into the Settings of the interface and clcik on the administration Settings.
- Click on the Firmware tab, where you can easily paste the version file and Install it.
How to Change WiFi Password?
- Reach to the WiFi extender interface window in your computer or laptop.
- Then, click on the settings and select the Wireless Networks settings.
- Here you must enter the SSID username and password, SAVE the settings.
How to Change Admin Password?
- Enter the WiFi extender interface genie wizard in your internet device.
- Go into the Advanced Settings and select the Admin details.
- Enter the new Admin credentials and SAVE the changes.
How to Change Frequency Bands?
- Reach to the WiFi extender interface window in your computer or laptop.
- Then, click on the settings and select the Wireless Networks settings.
- Choose the Channels > select according to the area (2.4 GHz and 5 GHz) and SAVE.
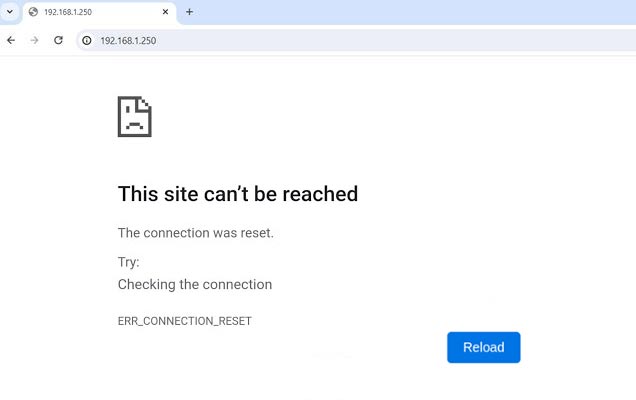
192.168.1.250 Issues
There can be many issues related to the IP address (192.168.1.250), take a close at the common issues;
- 192.168.1.250 not working
- IP address is blocked and not responding
- IP is not working in Chrome as well as Safari browser
- Extender network can’t connect to the computer
Reasons:
- Weak internet connection can be a big reason for the technical problem.
- Not connected to the extender network also be a cause of the issue.
- IP address is wrongly typed on the address bar of the browser.
- Wrong URL of the extender written on the browser address bar also trouble you the same mentioned issue.
Now, have a close look at some of the troubleshooting tips and solutions to fix any issue, mainly IP address is not working.
192.168.1.250 Not Working: Solutions
Ensure you are connected to extender
Most of the time the interface gets errors because the user is not connected to the Netgear extender network. You must connect your computer to the network to access the interface window and use it to set up and manage the settings.
Make sure IP address is correct
The IP address should be correct when you are typing it in the web browser. Some of the suers written it wrong like 192.169.I.250 or 192.168.1.25O. The correct IP address to access or reach the interface is 192.168.1.250.
Use the Updated web browser
Using an outdated web browser can be a reason why users fail to access the interface through the IP address. So, make sure the browser is updated to its latest version. To update the browser, go to its settings > click on the About > and select the UPDATE button.
Use URL instead of IP address
The Netgear extender setup can be done not only from the IP address, but you can also use the URL to manage the settings. The URL address is mywifiext.net for Windows and mywifiext.local for MAC OS.